Running example designs
This section desribes how to properly connect your board. It also helps you configure and run any other software that is necessary to observe results.
Connecting development boards
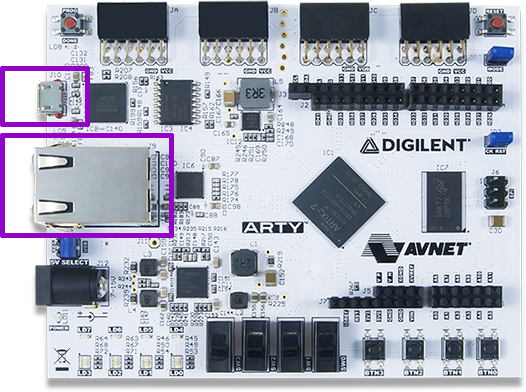
Arty board
Connect the board to your computer using the USB cable:
Connect the board to your computer using the Ethernet cable (only if you want to test the LiteX Linux Example)
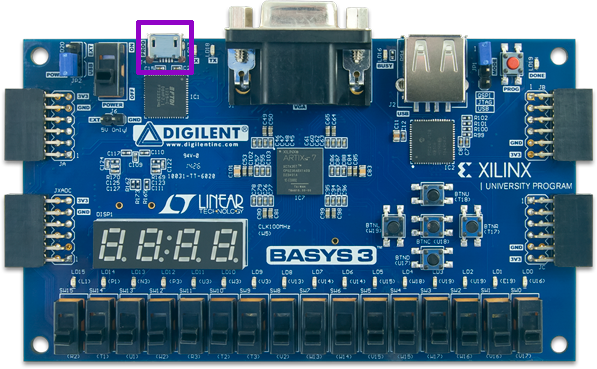
Basys 3 board
Connect the Basys3 Board to your computer using the USB cable:
Connecting to UART
First check available teletypes with:
ls -l /dev | grep ttyUSB
You should see at least one, e.g.:
crw-rw----+ 1 root  plugdev   188,   0 11-06 13:58 ttyUSB0
crw-rw----+ 1 root  plugdev   188,   1 11-06 13:58 ttyUSB1
Simply use picocom to connect:
picocom -b 115200 --imap lfcrlf /dev/ttyUSB1
Warning
Substitute 115200 with the baud rate that your design uses!
Warning
Please note that /dev/ttyUSB1 is just an example. The number appearing may change!
Note
If the picocom is unable to connect to any ttyUSBx device, you probably don’t have appropriate user permissions.
On Debian distributions, type the command below to add the user to the dialout group.
This should resolve the missing permissions problem:
sudo usermod -a -G dialout `whoami`
Setting up TFTP
It is assumed that the server is running on port 6069 and uses /tftp directory.
Install tftp with (Ubuntu example):
sudo apt install tftpd-hpa
Create a directory for the server:
sudo mkdir -p /tftp
sudo chmod 777 -R /tftp
sudo chown tftp -R /tftp
Set up your TFTP configuration with:
cat << EOF | sudo tee /etc/default/tftpd-hpa
TFTP_USERNAME="tftp"
TFTP_DIRECTORY="/tftp"
TFTP_ADDRESS=":6069"
TFTP_OPTIONS="--secure"
EOF
Restart the TFTP server:
sudo systemctl restart tftpd-hpa
Configuring your network interfaces
Check your network interfaces with:
ip link
Add IPv4 address to you interface:
ip addr add 192.168.100.100/24 dev eth0
Warning
192.169.100.100/24 and eth0 are just examples!